Showing posts with label fruit. Show all posts

Monday, March 5, 2012

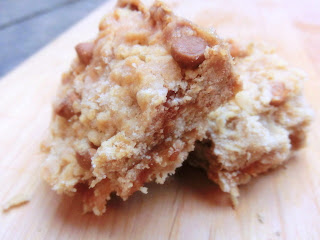
Apricot, Caramel, Coconut DOUBLE Crumb Bars


My grandma's favorite Starbucks treat was always their "Signature Coffee Cake." If she was feeling especially indulgent on a Sunday afternoon after church, we would go to Starbucks and she would order a piece. I never quite understood her fascination with it, once you got through the crumbly topping, the cake was kind of a let down. But that crumble on top..... it is kind of amazing. I would nibble on that and let grandma have the cake. Well, in the spirit of a good crumbly topping, I give you Apricot, Caramel, Coconut DOUBLE Crumb Bars. I just love buttery crumbly streusel so when I made these crumble bars I decided to double the streusel and it was a gooood plan. The thick crumble is dotted with butterscotch chips and surrounds a sweet gooey center of caramel, coconut and apricot. The caramel gives a creamy honeyed flavor that perfectly complements the cakey crisp topping. Yum!

Apricot, Caramel, Coconut DOUBLE Crumb Bars
Adapted from Pillsbury.com
4 cups flour
1 cup sugar
1 package butterscotch chips
2 cups butter, cut up
1 cup apricot preserves
1/3 cup caramel ice cream topping
3/4 cup unsweetened or sweetened shredded coconut

Heat oven to 350°F.
In food processor bowl with metal blade, put flour, sugar and butter.
Cover; process with on-and-off pulses until mixture looks like coarse crumbs. (Or, in a bowl, mix flour and sugar; cut in butter with pastry blender until mixture looks like coarse crumbs.) Mix in butterscotch chips.
In bottom of ungreased 13x9-inch pan, evenly press half of crumb mixture.
In medium bowl, mix preserves, caramel topping and coconut.
Spread over crumb mixture to within 1/2 inch of edges.
Sprinkle remaining crumb mix evenly over apricot mixture to edges of pan.
Bake 40 to 50 minutes or until edges are golden brown. Cool completely, about 2 hours before cutting into bars.
Have a sweet day!

Tuesday, September 13, 2011

Low Carb Berry Shortcake Parfaits

One of the challenges I have encountered with low carb baking is making desserts look elegant and appetizing. Many of the creations I have tried taste great but end up looking less than appetizing. When I was asked to make a dessert for a Memorial Day barbecue, I really wanted to make something delicious AND pretty. I found this recipe on foodnetwork.com and customized it, using a different biscuit recipe and adding raspberries. I was not all that happy with the appearance of the biscuits, but in the parfaits I crumbled them up and I think they turned out pretty elegant! The recipe came together quickly, and it satisfied even the strongest sweet tooth. Some people don't like taste of soy flour but I didn't get any complaints on the biscuits even from non low-carbers. The dough turns out really sticky, but if you dust your hands with a bit of flour and pat out the dough, it turns out well. You can make the biscuits a day or two before you are planning on serving the dessert, just store them in a Ziplock in the fridge. They did come out small so instead of layering them whole
in the parfaits, I crumbled them up. Doing this allows them to absorb more of the liquid from the berries. The whipped cream is just your basic homemade whipped cream, you can add Splenda or not depending on how sweet your berries are. I recommend serving these up in wine glasses for an especially fancy touch. Hope you all enjoy!

Berry Shortcake Parfaits
Adapted from foodnetwork.com
3 pints berries, cleaned and sliced (I used raspberries and strawberries)
  • 1/4 cup, or less depending on taste, sugar substitute (recommended: Splenda)
  • 1 recipe low-carb shortcake biscuits (recipe follows)
  • Low Carb Fresh Whipped Cream (recipe follows)
  • Few sprigs fresh mint


Combine berries and sugar substitute and refrigerate for at least 30 minutes. Crumble biscuits. Place half of the crumbled biscuit in a wine glass. Top with berry mixture and cream. Sprinkle on more crumbled biscuit and continue layering until you run out of berries and cream. Garnish with whole berries, and fresh mint.


Shortcake Biscuits
Adapted from yummly.com
1 cup soy flour
1 teaspoon baking soda
6 teaspoons Splenda
1 1/2 teaspoons cinnamon
1/4 teaspoon salt
1 egg, lightly beaten
1/4 cup cream

Preheat oven to 350 degrees. Lightly grease a baking sheet and set aside.
Sift together dry ingredients.
Combine egg with cream and add to dry ingredients. Divide dough into 7 equal balls. Place on baking sheet.
Pat the dough balls into flat circular shapes (do the best you can, remember your going to crumble them anyway). Bake for 10-12 minutes or until firm when pressed.
Allow to cool, store in a ziplock bag until ready to use.

Low-Carb Whipped Cream
1 cup heavy whipping cream
1/4 cup sugar substitute (Splenda is recommended)
1 teaspoon vanilla extract

With an electric mixer on high, whip the heavy cream just until frothy. Then add in the sugar substitute and vanilla extract and continue to whip on high until peaks form. Be careful not to over-whip, or cream will break. Store in a pastry bag or glass dish with a lid and refrigerate.

Saturday, May 14, 2011

Raspberry Filled Buttermilk Scones

This recipe is just perfect for brunch. The scone is familiar and comforting and the fruity filling makes for a lovely little surprise in the middle. You can use almost any jam or filling you have on hand, and the recipe can be doubled for larger crowds. The recipe originally calls for a food processor, which I don't have, so I included food-processor free directions as well. Just be sure not to over mix the scone dough as the texture can quickly go from light and tender to tough and dry when mixed with too much vigor. But if you keep your mixing and kneading to a minimum, in very little time you will have a steaming batch of buttery, flaky, fruit filled scones. Impressive and delicious!

Jam Filled Scones
Adapted from Country Living
1 1/2 cups all-purpose flour
1 1/2 cups cake flour
1 tablespoon baking powder
1 teaspoon salt
16 tablespoon unsalted butter, cut into 1-inch pieces
1 cup buttermilk
1 tablespoon lemon zest
1/2 cup jam (raspberry was my choice)
3 teaspoons sugar

Preheat oven to 400 degrees F. Place the flours, baking powder, and salt in the bowl of a food processor fitted with a metal blade and pulse until combined. Add the butter and pulse until the mixture resembles coarse meal. Add the buttermilk and zest and pulse until the dough is just combined.****
For people who don't have a food processor, place flours, baking powder and salt in a bowl. Using two knifes or a pastry blender, cut butter into flour mixture until mixture resembles coarse meal (no bigger than pea size clumps of butter). Add buttermilk and zest and mix until just combined (use a wooden spoon or your hands).
Shape the scones: Line a baking sheet with parchment paper and set aside. Place an 18-inch sheet of parchment paper on a work surface and sprinkle it lightly with flour. Transfer the dough to the paper and, with floured hands, gently press the dough into a 12- by 12-inch square; the dough should be about 3/4 inch thick.
Cut out two 6-inch circles, reshape the remaining dough into a 3/4-inch-thick square, and cut out one more 6-inch circle. Gather the remaining scraps and form into one final 6-inch circle. (basically you will end up with four equally sized circles).
Place 1/4 cup of jam on two of the circles. Top each with the remaining dough rounds and pinch the sides shut.
Using a knife, score the top of each scone with a large cross marking 4 quadrants. Sprinkle the tops with sugar. Transfer scones to the prepared pan and bake until golden -- 30 to 35 minutes.
Transfer to a wire rack to cool.
Split or cut on the scores. Serve warm or at room temperature.
Yum!
Have a lovely weekend! Linking up

Thursday, April 28, 2011

Chocolate Strawberries and Cream Pie

After Easter candy sales depress me. Chocolate bunnies and marshmallow chicks look down from their discount shelves, never to fulfill their Easter dreams. I always end up buying a few (of the bunnies, sorry chicks but I'm not a fan) and then they sit on my shelf waiting for some higher purpose. And I imagine that being used in this pie would be a chocolate bunny's dream. Well, actually maybe not since they get melted down and spread over a pie crust then topped with fluffy cream and fresh juicy strawberries. But hey, at least they made it out of the store, right?!
*Disclaimer, yes I realize that the bunnies are made of chocolate and probably don't have "feelings"

Chocolate Strawberry and Cream Pie
3 ounces chocolate, divided or one big Easter bunny broken into pieces
1/2 tablespoon butter (can be omitted if using a high quality Easter Bunny) `
1 pastry shell (9 inches), baked (use your favorite recipe)
2 packages (3 ounces each) cream cheese, softened
1/2 cup Sour Cream
3 tablespoons sugar
1/2 teaspoon vanilla extract
3 to 4 cups fresh strawberries, hulled
1/3 cup strawberry jam, melted

In a large saucepan, melt 2 oz. chocolate and butter over low heat, stirring constantly. Note -try to use a good quality bunny or the chocolate will be harder to spread when melted. Spread or brush over the bottom and up the sides of pastry shell.
Chill.
Meanwhile, in a large bowl, beat the cream cheese, sour cream, sugar and vanilla until smooth.
Spread over chocolate layer; cover and chill for 2 hours.
Arrange strawberries over the filling.
Brush with jam. Melt the remaining chocolate and drizzle over the top. Yield: 6-8 servings.
So good!

Wednesday, April 13, 2011

Apple Shortbread Bars

I found this recipe on Lovin In The Oven blog. It is fantastic (the blog and the recipe)! You really can't go wrong with any dessert made with apples. I picked up some fresh Pippin apples from the Portland Farmers Market (SO excited it's open!) and used them in the filling. They weren't too sweet or juicy so they were perfect for these bars. I took Kim's advice and used a smaller pan (8x8) so the bars came out thick, I also followed her suggestion to make less of the icing. She recommends leaving off the icing all together, as the bars are quite sweet. But when it comes to dessert sweet is a-ok with me so I left it on. The flavors are reminiscent of apple pie, but the shortbread gives the bars a sweet crunch that really takes these bars to the next level of decadent dessert! You should absolutely make these, now, you will NOT be disappointed!

Apple Shortbread Bars
Shortbread Crust Ingredients
2 c. flour
1/2 c. sugar
1/2 tsp. baking powder
1/2 tsp. salt
1 c. real butter, softened (no substitutions!)
1 egg, beaten

Apple Filling Ingredients
1/2 c. white sugar
1/4 c. flour
2 tsp. apple pie spice, or cinnamon
4 c. (about 3 medium) sliced, peeled baking apples (I used 3 pippin apples)

Glaze Ingredients
1 c. powdered sugar
About 2 Tbsp. milk
1 tsp. vanilla extract

To prepare crust, mix flour, sugar, salt, and baking powder in a medium bowl.
Cut in butter with a pastry blender or use your hands to mix in until you have pea-sized crumbles.
Gently mix in beaten egg. Spray an 8x8 pan with non-stick cooking spray.
Gently pat about 2/3 of the crumb mixture onto the bottom of the dish. Preheat oven to 350 and set aside.
To prepare apple filling, combine flour, sugar, and apple pie spice.
Toss with apples and spread apples out on prepared crust. I actually forgot to toss apples with flour and sugar and had to pick them off the crust and toss them. Apparently I can't watch TV and bake at the same time ☺
Pat reserved crust mixture over the apples, it's ok if there are some uncovered parts, its supposed to be like a streusel. I just tore off bits of batter with my fingers and patted it into place. Bake in preheated oven for 45 minutes, or until lightly browned. When finished, allow to cool completely. To prepare glaze, whisk together powdered sugar, vanilla extract, and enough milk to achieve desired consistency. My tip, to make less of a mess, combine all glaze ingredients in a Ziploc bag and smoosh together with your hands. Be sure not to leave any powdered sugar lumps. When glaze is desired consistency, cut off a very small portion of one of the corners of the Ziploc.
Drizzle glaze over cooled pastry and allow to harden (you can place it in the freezer to hurry things along).
Cut into bars and serve.
What's your favorite fruit dessert? I think these might be mine!

Saturday, March 26, 2011

Banana Nut Muffins


Need an easy weekend breakfast? How about banana nut muffins? With a streusel topping? No problem! These are simple, no fuss muffins that require few ingredients, barely any effort and little time. The recipe comes from a 1968 Better Homes and Gardens New Cook Book. It started out as a Banana Coffee Bread Recipe. I made some changes, and out came these moist, satisfying muffins! The simplicity of the recipe allows the bananas to really steal the show while the streusel topping adds a nice crunch. Hope you enjoy!

Banana Nut Muffins
From Better Homes and Gardens New Cook Book, 1968 Edition
Makes 12 Muffins
See! OLD recipe!

1/2 cup butter, softened
1/2 cup brown sugar
1/2 cup white granulated sugar
3/4 cup mashed ripe bananas, about 3 medium bananas
2 eggs
1 1/4 cups flour
3/4 teaspoon baking soda
1/2 teaspoon salt

Preheat oven t0 350 degrees. Grease a twelve cup muffin pan, or use paper liners.
Cream butter and sugar until fluffy. Add eggs, one at a time, beating well after each.
Stir in bananas, stir in dry ingredients. Mix well. Fill muffin tins about 3/4 full (mine were a little fuller).
Sprinkle with streusel topping (recipe below).
Bake for 25-30 minutes, or until a cake tester comes out clean.

Streusel Topping
1/2 cup flour
1/4 cup brown sugar
1/4 cup white granulated sugar
1/2 teaspoon ground cinnamon
1/4 cup chilled butter
1/4 cup finely chopped nuts

Mix flour, sugars, and cinnamon; cut in butter till crumbly.
Add nuts. Sprinkle on top of muffin batter.
I had some extra, which I put in a Ziploc and threw in the freezer. All ready for the next time I'm craving a batch of muffins or coffee cake.
Have a lovely weekend!